Introduction
Please note that these instructions are provided to those that wish to install Windows from scratch.
If you want us to install a base Windows image for you, please follow the instructions in
DTC Configuration and then send us a support ticket to [email protected].
The below guide will details how to install Windows using the DTC interface. Installations are performed by using an official Microsoft Windows .iso file (a CD image) and require you to have a VNC viewer installed on your local machine. Examples of suitable VNC viewers are RealVNC and TightVNCViewer.
DTC Configuration
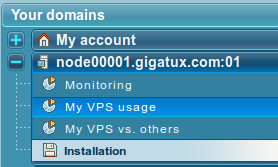
Log into your DTC panel using the URL and credentials provided in your welcome email.
Under My Account, select your VPS (nodeXXXXX.gigatux.com:YYY) and then select Installation.
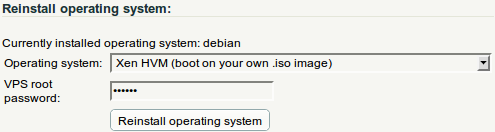
Under Reinstall operating system -> Operating system, select Xen HVM (boot on your own .iso image), type anything in the VPS root password box and then click Reinstall operating system.
At this time, the DTC configuration is being rewritten, so you will see the following:

Wait for approximately one minute and then click Installation again:
Click on Boot device to choose the operating system you wish to install. This selects the CD that will be emulated in your VPS and this will be the default boot device. Enter a secure password for the graphical interface in VNC console password and set VNC console activation to yes. Then, click Write parameters.

Windows Installation
Start VPS
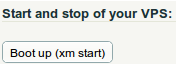
You are now ready to start your VPS. Click on Boot up to initialise your VPS. This can take a few minutes so wait until the screen refreshes before continuing.
Start VNC Viewer
Load the VNC viewer you previously installed on your local PC and connect to nodeXXXXX.gigatux.com:YYY where XXXXX is the node number (e.g. node49001 would be 49001) and YY is your VPS number. This information is found in the DTC console under My Account, with the below example being node00001:01
Windows will run through a few screens and prompt you for installation questions. The exact questions vary between Windows installations so they will not be covered here. Suffice to say, most defaults should work fine.
One point to note is the mouse pointer on the VNC interface does not always match up with your real mouse pointer, so you may find it easier to use the keyboard at this point.
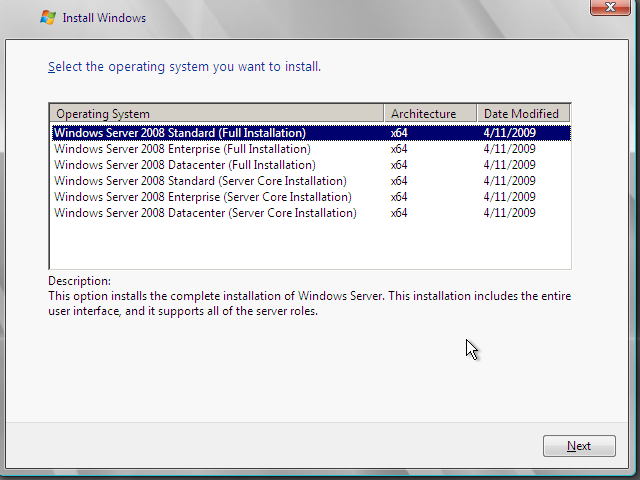
At some point, you may be given the choice of operating systems to install. We recommend using a 64-bit one (x64) and performing a Full Installation (unless you know exactly what you are doing). For instance, the first three are recommended with the following operating system selection screen:
The Windows installation process involves many reboots, and every time this happens you will need to restart your VNC viewer.
Eventually, you will be sent to a login screen. If you need to press Ctrl-Alt-Delete, you may simulate this by keying F8 and selecting this from the menu.
Configure Windows Networking
Please click here to see details on how to configure Windows networking.
Enable Remote Desktop
As VNC is not best suited to administering your VPS, we recommend you set up Remote Desktop and use an appropriate RDP client to connect.
In Windows 2008, in the Initial Configuration Tasks section you should see a Remote Desktop section which leads to the following window. In Windows 2012, move the mouse to the bottom right of the screen to activate the charm bar, click Settings and then Server Info. From here, click Advanced system settings and then the Remote tab.
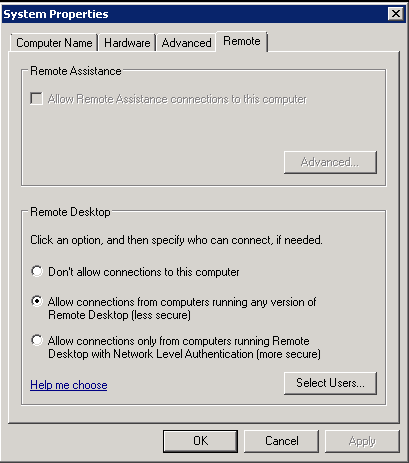
Click Allow connections from computers running any version of Remote Desktop or Allow remote connections to this computer with the checkbox underneath unchecked. Then, click OK. Now you should be able to close your VNC viewer and load a Remote Desktop viewer (e.g. Start -> Run -> rdp on Windows, or Remmina on Ubuntu) to connect to your VPS's real IP address with the username Administrator.
Changing Default Boot Device
When you next shut down your VPS, you need to change the default boot device to boot off the hard disk instead of the Windows installation media again.
Click on Boot device and select Boot on hard drive. Then, click Write parameters.
GPL-PV Drivers for Performance
These steps are very important - you will not get the performance you require unless you perform these additional steps.
The default Windows drivers for hard disks and network rely on Xen emulating a 'real' hard disk interface and network interface. There are alternate drivers which take advantage of the fact that these are virtualised and these must be installed to get decent performance. GigaTux requires that you do this and only in exceptional circumstances do we allow the regular drivers to be used. This is good for you (better performance) and us (less wasted resources).
Inside your Windows VPS, navigate to the GPL PV site by:
- Windows 2008: Type, in a Run box, iexplore http://wiki.univention.de/index.php?title=Installing-signed-GPLPV-drivers
- Windows 2012: Click on the start menu by moving the mouse pointer to the lower left of the screen. Load Internet Explorer and then navigate to http://wiki.univention.de/index.php?title=Installing-signed-GPLPV-drivers
Choose the driver most appropriate for your OS. e.g. for Windows 2008, choose one with Vista2008 in the filename, along with x64 for 64-bits, no debug and the latest version you can find. Let Windows install this fully and then allow your machine to be restarted.
At this point, you will lose networking. This is because a new network interface has been created. You will need to load your VNC console as before, view your Network Connections, select your original Local Area Network connection and click Disable. Then, configure all IP settings on the new network connection, which should be displayed as Xen Net Device Driver. Then, reboot your VPS again and you will see the original network interface has disappeared.
If you still do not have networking, you might need to temporarily set the Xen Net Device Driver to use DHCP, click OK, and then set up the IP addresses again.
General information on this is available at http://wherethebitsroam.com/content/gplpv
If the above link does not work for the GPL_PV drivers, try http://www.xenproject.org/downloads/windows-pv-drivers.html which providers tar files containing various executable drivers. These are probably not signed, although will be more modern drivers.
Activation
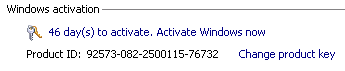
In order for your installation of Windows to continue working, the product key needs to be changed to one recognised by Microsoft. Click on the Start menu, select Control Panel and then System. You will see something similar to the following at the bottom of the System window.
Click on Change product key to bring up the following window:
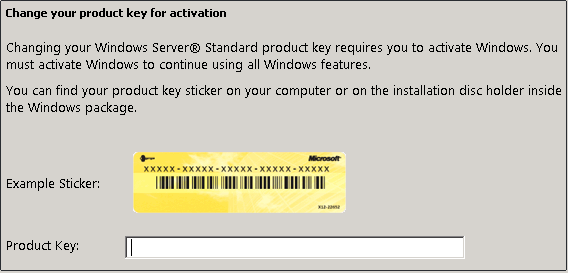
Enter the product key in the space after Product Key. This should have been provided to you in your welcome email. Click Next to continue.

After a short pause, a screen saying that activation was successful should appear. Your Windows VPS is now configured and ready for use.
